
Last revision June 27, 2017
The School of Earth, Energy & Environmental Sciences File Server cluster provides access to multiple individual and group network file shares organized into several storage pools with different network names. The main network name that applies to most shares is sesfs.stanford.edu, which will be used in these instructions. To connect to shares in the cluster hosted on other network names, such as sacfs.stanford.edu, simply substitute that other name in these instructions in place of sesfs.stanford.edu.
These instructions only work for versions of Mac OS X that are supported at Stanford Earth: "Lion" (10.7.3 through 10.7.5); "Mountain Lion" (any version of 10.8); "Mavericks" (any version of 10.9); "Yosemite" (any version of 10.10); "El Capitan" (any version of 10.11); and "Sierra" (any version of 10.12). Use the About This Mac item from the "Apple" menu to find out your current version. Use Software Update... from the "Apple" menu to get the latest updates for your version of Mac OS X.
If you still are using an earlier version of Mac OS X, you are strongly recommended to upgrade! If you need help upgrading your Mac OS or cannot make a connection following these instructions, put in a request on the HelpSU web site.
Due to a security restriction in the campus network firewalls, you can only connect to file shares on the School of Earth, Energy & Environmental Sciences File Server cluster if your computer is connected to the Stanford campus network. If you are off-campus, you can install and use the Stanford VPN client on your computer. That client authenticates you (using your SUNet ID) so your off-campus network connection will be treated by the firewall as if you were on campus. Alternatively, you can use an sftp client program from anywhere on the Internet to connect to the alternate server sestransfer.stanford.edu to access your files.
You need to know the name of the share you want to use and the network name of the node that is sharing it. The network name sesfs.stanford.edu is used in these examples, because it serves the most shares. You can repeat this procedure to connect to multiple shares at once.
Connections are done from the Finder. Make sure the Finder is active (click on a Finder window, or its icon in the Dock, or an empty area of the desktop). From the Go menu, select the Connect to Server... item, as shown in the following screenshot. The number of predefined shortcut folders may vary, but Connect to Server... will always appear at the bottom.
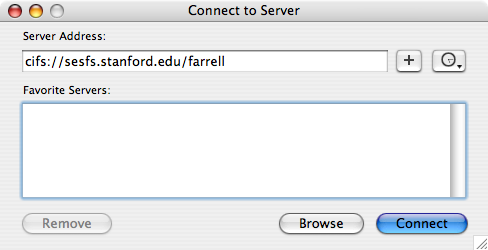
This will open the Connect to Server window. You type the information needed to connect to the file server in the Server Address: field. The syntax is:
cifs://sesfs.stanford.edu/sharename
where you substitute the name of the file share you desire for sharename. For example, in the screenshot below, I want to connect to the home share named farrell:
After typing the share address, click on the Connect button. You will see the Connecting To Server window for a few seconds, as shown in this screenshot:

At this point, the file server needs to determine who you are and whether you have rights to access the share in question. The file server nodes are part of the campus Windows Domain Active Directory authentication system, which uses your SUNet ID and password to prove your identity. If a workstation is also joined to the Windows Domain, and you use your SUNet ID and password to login to that workstation, then the workstation just passes that information along to the server. This is commonly done with Windows workstations on campus, but is also possible with Mac OS X workstations (version 10.6 or later). In particular, the Macs in the School computer labs in Mitchell A59 and A65 are joined to the Windows Domain, so they can automatically pass along your identity information to the server. A few general use Macs in other areas are also joined to the Windows Domain. For these machines, there is nothing more you need to do - you will be automatically connected to the server (assuming you have rights to access that share).
In the normal case of a Mac that uses local accounts, you will now be prompted to enter a username and password for access to the file server, as shown in this screenshot:

The Registered User button should be checked and is required; no guest logins are allowed to any of the School of Earth, Energy & Environmental Sciences File Server cluster nodes. The Mac will "helpfully" pre-fill the username field with the name of your local logged-in account on the Mac. You must replace this with your SUNet ID username and password. You must use your original login form of the SUNet ID. You cannot use an email alias form. And here is the most important thing: you must prefix your SUNet ID with WIN\, as shown in this screenshot:

Why do you need the WIN\ prefix in front of your SUNet ID username? This tells the server to authenticate you by checking the information you provide against the Windows Domain Active Directory. Otherwise, it would just check your information against its list of local server accounts - of which there are none (except for system management accounts).
When the connection is finished, a separate Finder window generally opens to show its contents. You treat this network disk volume as if it were directly attached to your Mac.
Some versions of Mac OS X do not automatically show this network disk volume on the desktop; rather, they list the server name sesfs under the Servers or Shared item (depending upon OS version) in the left sidebar of all Finder windows. As of June 2017, a security upgrade on the file server cluster prevents access from this server name in the Finder sidebar. If you click on it you will not see any share names.
Your only reliable way to see the share contents on your Mac is to make sure that it shows up on the desktop as a network disk. This is done in the Finder preferences. Select the Preferences item from the Finder menu, as shown here:

When the Finder Preferences window opens, make sure the General tab is selected. Then you will see a list of items that are shown on the desktop. Make sure that you have checked the box next to the Connected servers item, as shown circled in red in the screenshot below:

After you set your Finder preferences to show connected server volumes on the desktop, you can just double-click that network disk icon with the share name to open a Finder window to display the contents.
When you are done working with the share, you can disconnect it by dragging the share's network disk icon on the desktop to the Trash, or by right-clicking on the icon (or hold the Control key while clicking with a single button mouse) and selecting Eject from the contextual menu that appears.
You will also disconnect automatically if you logout from your Mac or shut it down.